I received some advise on improving my presence on blogs and etsy. Apparently people really like good, interesting photos, go figure. After initially feeling a little defensive on the implied lack of Ansel Adams talent I decided to set my mind to improving my photos and making them a little more interesting. I have found myself wandering the vast and mostly vacant halls of the web discovering little and feeling a little numb. However when you have a particular question or need it is the most amazing tool of knowledge from which many good things can come. Here are some websites I discovered from which I garnered most of my knowledge on the subject of photos. It does little good to regurgitate what they have already said just go there for yourself.
http://www.studiolighting.net/homemade-light-box-for-product-photography/
http://www.bermangraphics.com/digital-jury-resources/digital-cameras.htm
http://digital-photography-school.com/macro-photography-tips-for-compact-digital-camera-users
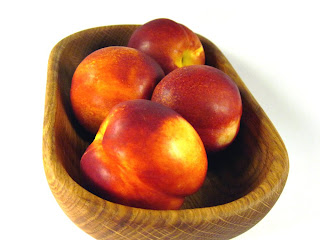
I set about lighting the bowls according to the ideas presented in these articles. I used two cheap table lamps which I coupled with 2 100 watt equivalent energy efficient bulbs. Over the bulbs I placed a sheet of light tissue paper to defuse the light and make it a little less harsh. I used a sheet of white wrapping paper as a background to keep the focus on the bowl itself. Placing the bowl in the frame took some getting used to as they can be quite large. Once I got used to this though it is simply a matter of placing the bowl in positions experience tells me would look best.

The camera, a Cannon Power Shot A1100 AS, is mounted on a small cheap tripod which rests on the floor. I place the camera in "program" mode and set the ISO to 400, the light source to tungsten, the effects to vivid, and move the lens setting to Macro. I focus the lens on a forward edge to the bowl or item to be photographed which causes the images furthest from the camera to be slightly out of focus. I feel this adds character and interest to the photo.
The last step in the process is to edit the photos to make them look their best. I use picnik which you can find and use for free at
http://www.picnik.com/ simply upload your photos and you can edit them like a pro. I would caution against trying to use software like this to make a bad photo look good. It really takes very little editing to make a photo really look "shopped", it is best to have a good photo to begin with and use this software to crop, re size, and and subtly bring out some of the finer details in the already fine photograph.
I hope some of the tips and links here help you find your way to even better photos and a more enjoyable experience. It is simply not good enough in the online world to have a great product, you also have to have great photographs. While some I know have hired professional photographers at what I imagine to be relatively great expence I hope my photos show that you can achive good results with a lower end digital camera and a little know how.


 The last step in the process is to edit the photos to make them look their best. I use picnik which you can find and use for free at http://www.picnik.com/ simply upload your photos and you can edit them like a pro. I would caution against trying to use software like this to make a bad photo look good. It really takes very little editing to make a photo really look "shopped", it is best to have a good photo to begin with and use this software to crop, re size, and and subtly bring out some of the finer details in the already fine photograph.
Thanks for the tips!!! Well written, too.
ReplyDelete